
HubSpot Agent Hub lets you build Custom Agents that use your CRM data and knowledge sources to handle tasks based on your instructions. You can give agents specific actions and connect them through workflows. This guide walks you through building, configuring, testing, publishing, and managing your own Custom Agents.
Think about everything that goes into answering a support ticket….
You have to read the ticket, you have to check the contact and company records, you have to figure out how urgent it is, you have to dig through support docs, and then you have to write a response.
And that's just for one ticket!

With 67% of consumers expecting their support tickets to be resolved within three hours, that's a lot of pressure on teams already juggling dozens of requests.
Imagine if an agent could handle most of it so your team could spend more time reviewing responses and helping customers.
That's one way you can put Agent Hub to work.
But of course, you still have to know how to build the thing.
In this guide, we'll show you how to create your first Custom Agent in HubSpot, connect it to workflows, test it, and make sure it's doing its job.
Key Takeaways
- HubSpot Agent Hub lets you build Custom Agents that use CRM data, instructions, and knowledge sources to complete tasks.
- Not every task needs a Custom Agent. Standard workflows and existing HubSpot AI tools may already handle simpler processes.
- Custom Agents need three things to work: The right actions, relevant knowledge, and inputs that tell them what information to use.
- Agent Hub workflows connect multiple agents. One agent can update CRM information that another agent uses to complete the next task.
- Testing and monitoring matter. Review agent outputs, approval requirements, and HubSpot Credit usage to keep agents working as intended.
What Is HubSpot Agent Hub?
HubSpot Agent Hub is a workspace for creating, managing, and monitoring AI agents inside HubSpot. It includes Agent Builder, Agent Marketplace, Agent Inbox, and tools for coordinating agents through workflows.
With HubSpot Custom Agents, you can define a specific job, give the agent access to relevant CRM information, and control which actions it can perform. Agents can work independently or as part of a larger process managed by a workflow.
Agent Hub includes four main tools:
- Agent Builder: Create Custom Agents or modify existing ones.
- Agent Marketplace: Find and install prebuilt agents.
- Knowledge Vaults: Store information that multiple agents can use.
- Agent Inbox: Run agents manually, review activity, and check results.
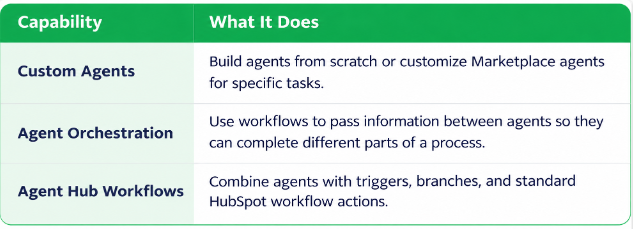
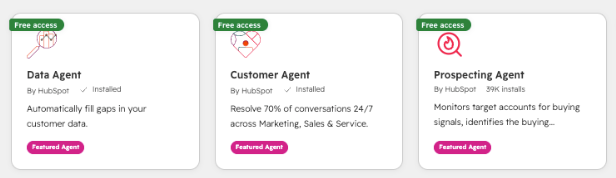
Agent Hub also works with HubSpot's existing Customer Agent, Prospecting Agent, and Data Agent. You can use Custom Agents to extend their capabilities without replacing them.
What Can You Use Agent Hub For?
HubSpot Agent Hub can help sales, marketing, and customer service teams automate work that requires reviewing information and making decisions.
For example, a Custom Agent can review support tickets, reference customer records, and draft responses for a representative to approve. And with 75% of CRM leaders saying AI has helped reduce customer service response times, there's a good reason to put it to work.
You can also use Agent Hub workflows to coordinate multiple agents when a process requires more than one task.
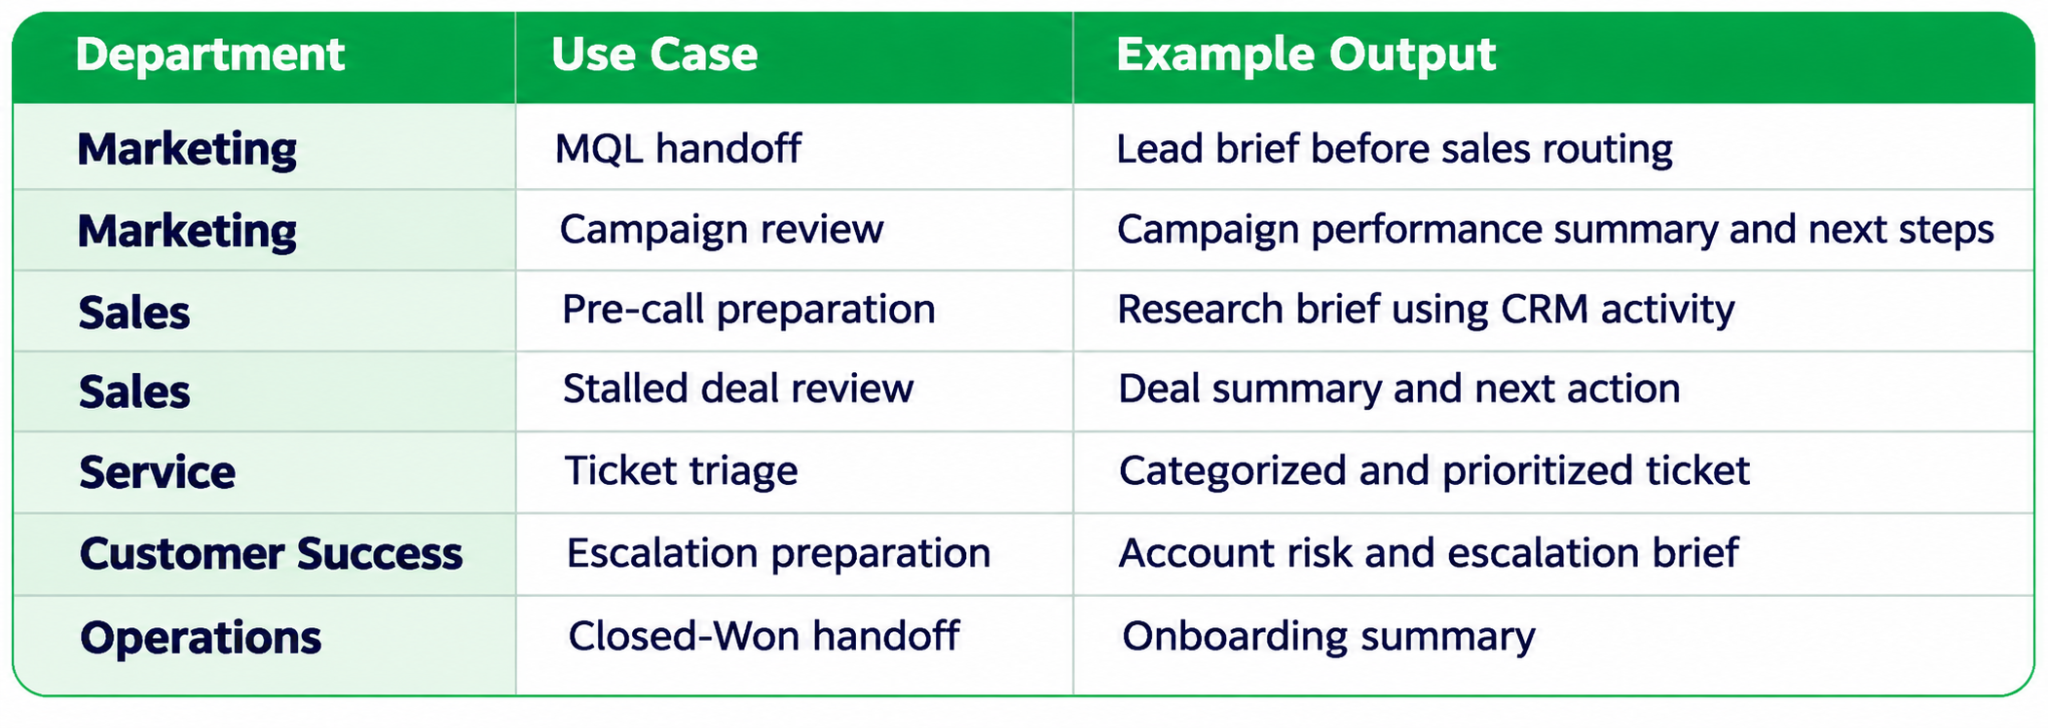
Where Should You Start?
Start with the handoffs that eat up the most time.
Think about everything marketing needs to pass to sales before a rep reaches out. Or how much information someone has to gather when a customer issue gets escalated.
Processes your team handle repeatedly and spend too much time preparing are good places to start with Agent Hub.
When Should You Use a Custom Agent Instead of a Workflow?
Use a HubSpot Custom Agent when a task requires interpreting information and deciding what to do with it. If the process follows a predictable set of rules, a standard HubSpot workflow is usually the better choice.
How to Choose the Right HubSpot Tool
Before building a Custom Agent, work through these questions.
1. Can a standard workflow handle it?
Start here. If HubSpot can complete the task using existing properties and predefined rules, there's probably no reason to involve an agent.
For example, assigning support tickets based on their priority is something a standard workflow can already handle.
2. Does HubSpot already have an AI feature for it?
Check what's built in before creating something new.
HubSpot's AI ticket summaries can save reps from reading through an entire conversation. But they require manual refreshing and don't offer much room for customization.
If you need a summary that follows your own requirements, a Custom Agent may be worth building.
3. Would Data Agent be enough?
If the job involves analyzing CRM information and updating a property, consider Data Agent.
For example, it could review a support ticket and populate a Ticket Triage Summary property with the issue category and priority.
4. Does the task need its own instructions?
This is where Custom Agents become useful.
If you want an agent to read a support ticket, reference your company's support documentation, and draft a response that follows your guidelines, you can build a Custom Agent for that specific job and have a rep review the response before sending it.
5. Does the process need more than one agent?
Some tasks are better split between agents.
Data Agent could handle ticket classification while a Custom Agent prepares the response. A HubSpot workflow connects them, using the first agent's output to inform the next step.
Which HubSpot Tool Should You Use?
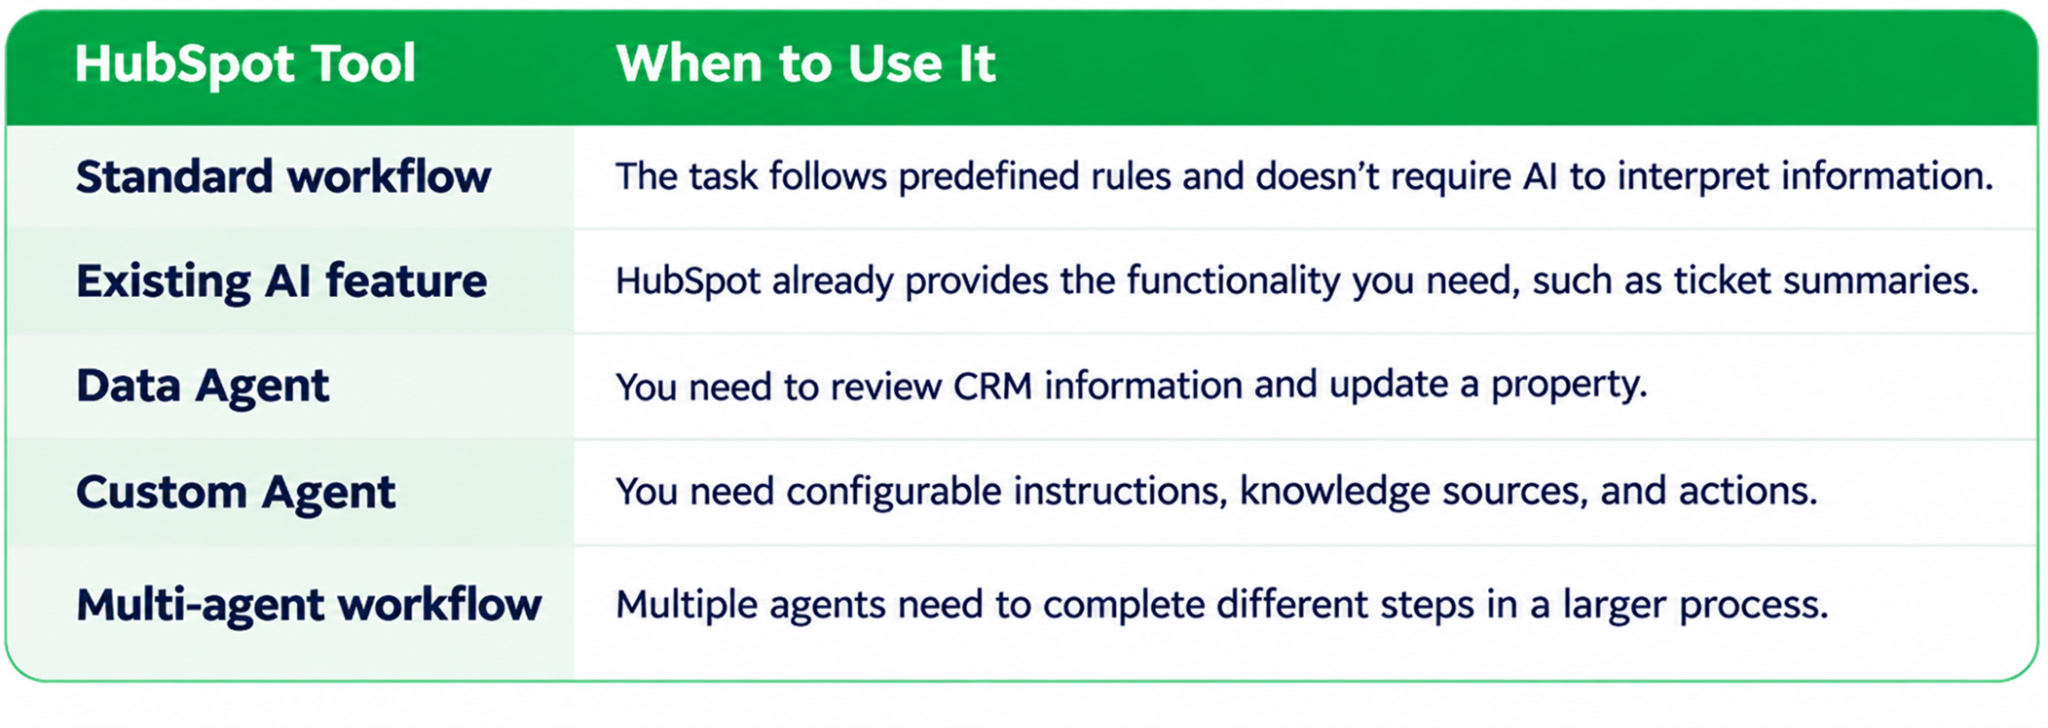
Using an agent doesn't mean removing people from the process. CRM updates may require approval, and your team can still review important outputs before taking action.
How to Build a Custom Agent in HubSpot
Building a Custom Agent in HubSpot starts with figuring out what you want it to do. From there, you'll set up the agent, give it the information it needs, and decide what actions it can take.
Here's how to get started….
Step 1. Set Up Agent Hub in HubSpot
Before building a Custom Agent, confirm that your HubSpot subscription supports Agent Builder and that your account's AI settings are enabled.
Check Your Subscription and Permissions
Follow these steps to get access:
- Confirm your subscription. Agent Builder is available with eligible HubSpot Starter, Professional, and Enterprise subscriptions. Availability varies by product, and some advanced features require higher tiers.
- Open your AI settings. Click the settings icon and navigate to Account Management → AI → Access. A Super Admin must configure these account-wide settings.
- Enable generative AI. Turn on Give users access to generative AI tools and features.
- Allow access to account data. Enable CRM data and Files data, along with the customer data access setting listed in your account. HubSpot's documentation refers to this as Customer conversion data.
- Enable Breeze Assistant. Turn on Give users access to Breeze Assistant.
- Verify Agent Builder permissions. You need Super Admin or Agent Builder permission to create and customize agents. To check access, open the user permissions editor and search for AI features.
If you don't have permission to change these settings, contact your HubSpot Super Admin.
Navigate Agent Hub
Once your account is ready, go to Agents → Agent Hub. If you don't see Agents in the main navigation, check the More menu.
Here's where to find the main tools:
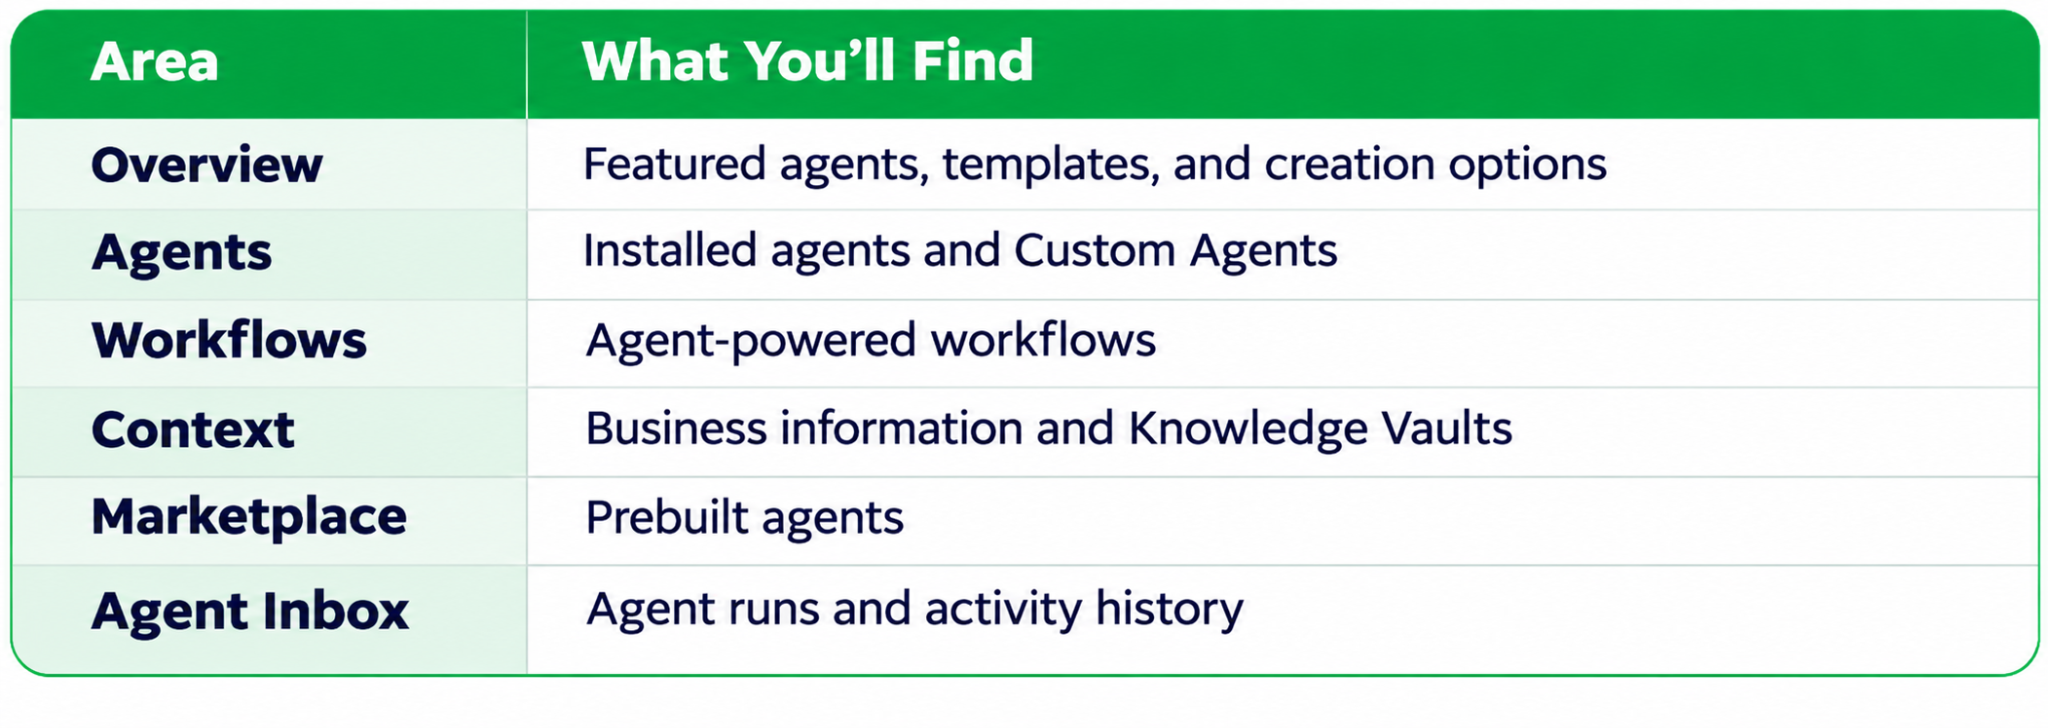
On the Intro tab, use the Create dropdown to start building an agent.
If Agent Hub or its creation options aren't available, ask your HubSpot administrator to check your subscription and permissions.
Step 2. Review Your HubSpot Credits
Custom Agents consume HubSpot Credits when they run. Before building one, check how many credits your account has available and how much your existing HubSpot features already use.
How to Check HubSpot Credit Usage
- Open Account & Billing. Click your account name in the upper-right corner of HubSpot and select Account & Billing.
- Select HubSpot Credits. Open the HubSpot Credits tab.
- Review your monthly allocation. Check how many credits your account receives each month.
- Check current and historical usage. See how much of your allocation has already been consumed.
- Review usage by feature. Look for consumption from Customer Agent, Prospecting Agent, Data Agent, and other credit-based features.
- Estimate your agent's workload. Consider how often it will run and how many records it will process.
How Many Credits Does a Custom Agent Use?
Credit consumption depends on the agent's configuration and the actions it performs.
You can simulate agent runs in Agent Builder without consuming credits. HubSpot also provides estimated credit usage for simulations, helping you plan before publishing.
Step 3. Plan Your Custom Agent
Before opening HubSpot Agent Builder, document the job you want your Custom Agent to handle.
Choose one repeatable process and map out how your team completes it today. This gives you a starting point for deciding what the agent should do and where a person still needs to be involved.
Define the Business Process
Answer these questions before building:
- What task needs to be completed? Be specific. Instead of “help with support,” choose something like “prepare a first response to a new support ticket.”
- Who handles it today? Identify the person or team responsible for completing the task.
- How often does it happen? Estimate the daily or weekly volume to understand how much time automation could save.
- What information does the task require? Document which CRM records or internal resources someone needs to review.
- What happens after the task is completed? Identify where the result should go and who needs to act on it.
- What outcome should improve? Choose something measurable, such as reducing the time support reps spend preparing responses.
Define Your Custom Agent's Requirements
Next, turn those answers into a simple agent specification.
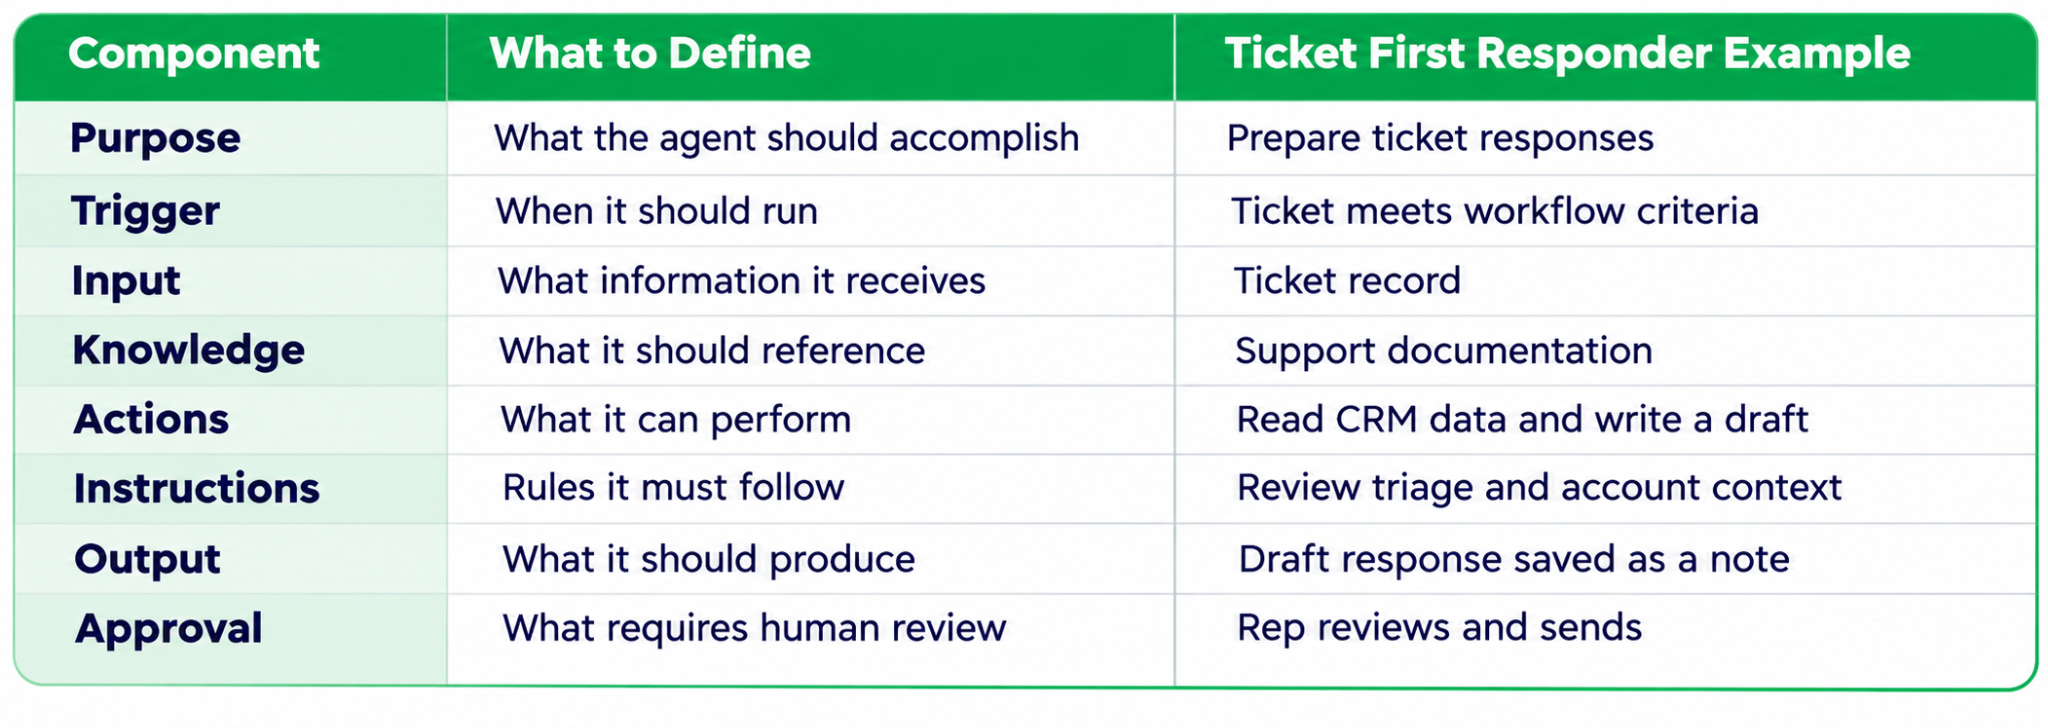
Check your knowledge sources before moving on. If the agent needs support documentation to prepare accurate responses, make sure that information is available and up to date.
If the documentation is incomplete, address those gaps before building an agent that depends on it.
Step 4. Create a Custom Agent in Agent Hub
To create a Custom Agent in HubSpot, open Agent Hub and use Agent Builder to create an agent for the task you planned in Step 3.
You can customize an existing Marketplace agent or create your own with help from Breeze Assistant.
Choose How to Build Your Agent
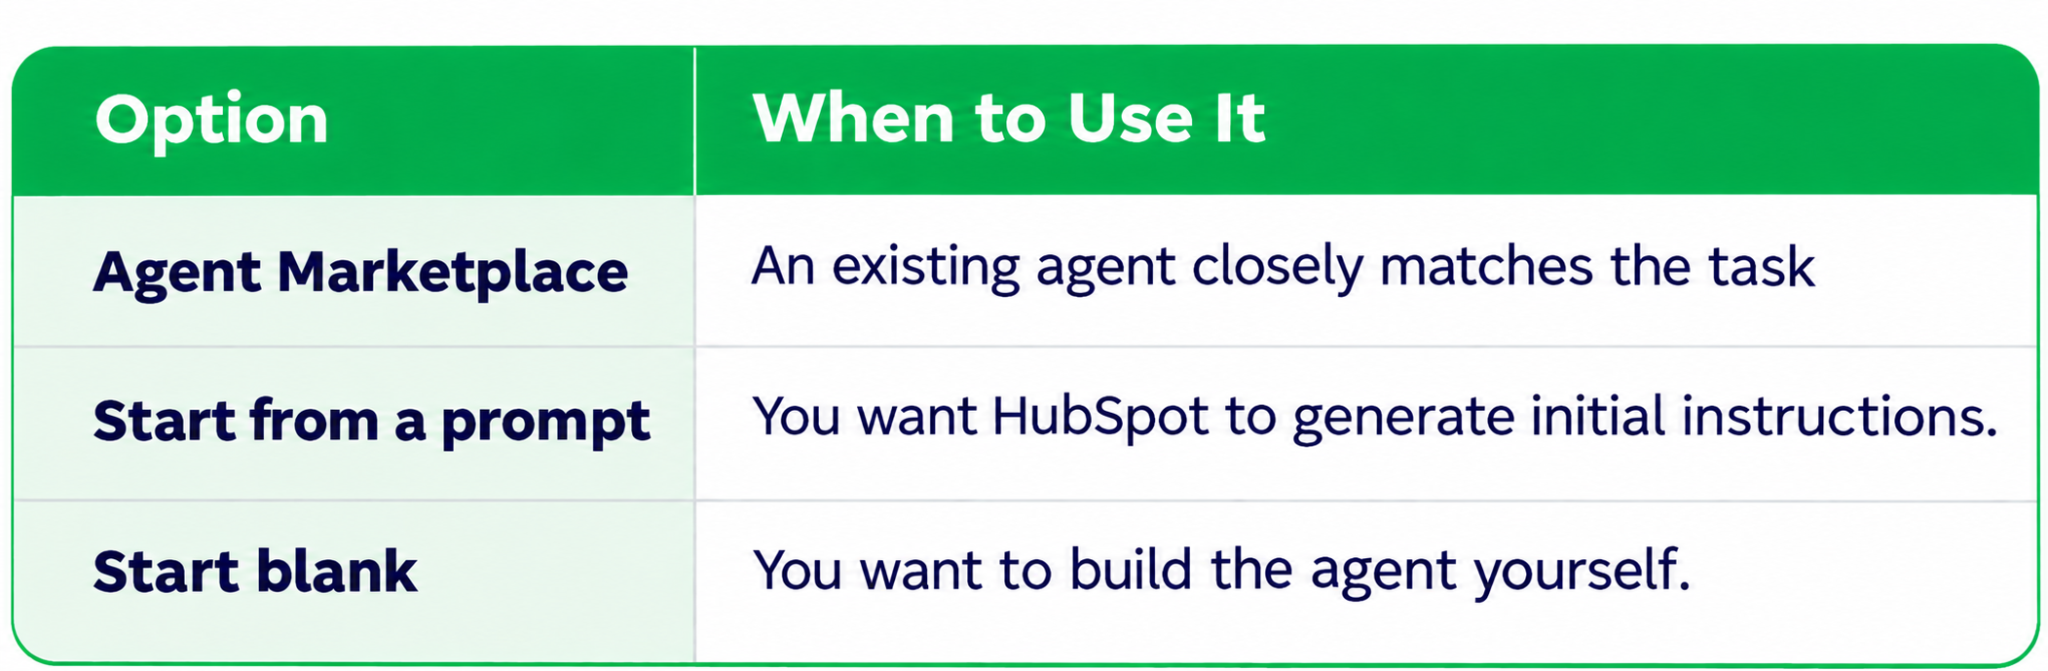
Marketplace agents can be customized after installation, so check what's available before creating something new.
How to Create a Custom Agent in HubSpot
- Open Agent Hub. In your HubSpot account, navigate to Agents → Agent Hub. Depending on your navigation, you may need to open More first.
- Select Create. On the Intro tab, click the Create dropdown in the upper-right corner and select Agents.
- Choose your starting point. Use Breeze Assistant to describe the agent you want to build, or configure it manually in Agent Builder.
- Describe the task. For our Ticket First Responder example, enter: Create an agent that prepares draft responses to incoming support tickets for a representative to review.
- Review the proposed setup. Breeze Assistant can suggest an initial configuration based on your request. Check that it matches the task you planned.
- Continue in Agent Builder. Review the available configuration sections before making changes.
You can keep using Breeze Assistant while building your agent if you need help refining the setup.
Your agent still needs to be configured and tested before it's ready to publish.
Step 5. Write Your Agent's Instructions
Your Custom Agent's instructions tell it how to handle a task and what the finished result should look like.
In HubSpot Agent Builder, use plain language to explain what the agent should do. Be specific about which information matters and how the agent should handle situations where it doesn't have enough context.
Use the Role, Goal, Approach, and Output Framework
Organize your instructions using four components:
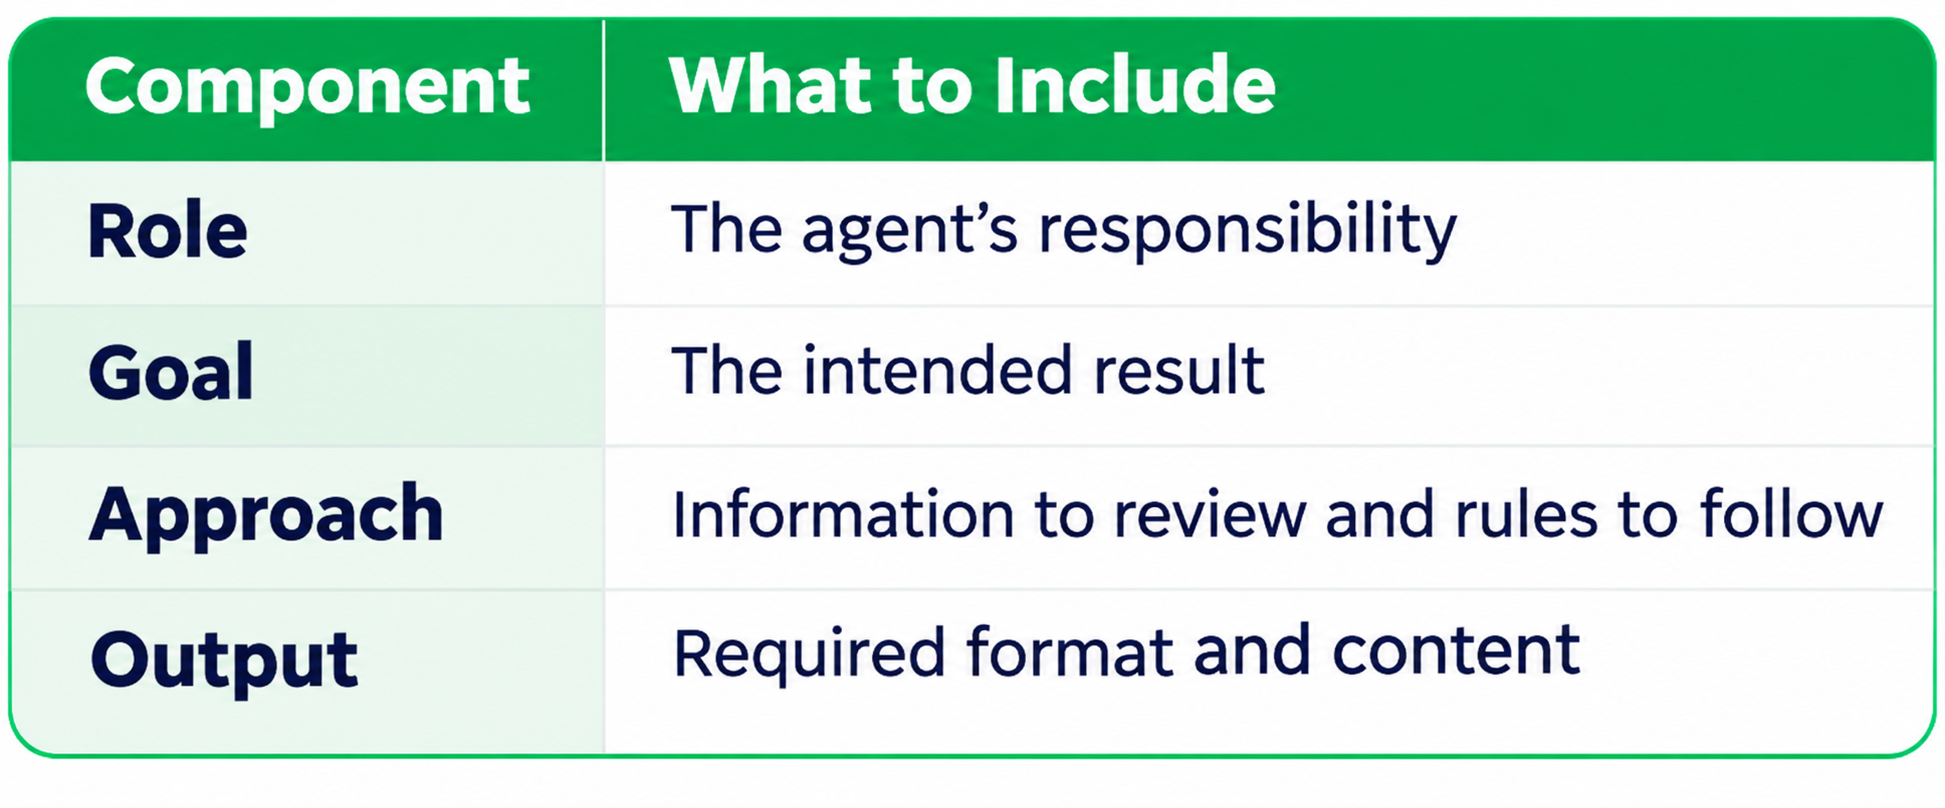
The Approach section should explain how the agent completes the task, including any restrictions. For example, you can tell it not to make assumptions when CRM information is missing.
Use Output to specify how the result should be structured. You can also set a word count or require particular details when consistency matters.
Example Instructions for a Ticket First Responder
Here's a complete example you can adapt in Agent Builder:
Role
Act as a support ticket response assistant.
Goal
Prepare an accurate draft response for a support representative to review before sending it to the customer.
Approach
- Read the support ticket description and available conversation history.
- Review the Ticket Triage Summary property to understand the issue category and priority.
- Check the associated contact and company records for relevant customer information.
- Reference available support documentation to determine how the issue should be addressed.
- Draft a response based only on information you can verify.
- If information is missing or the issue cannot be resolved from the available documentation, flag what the representative needs to investigate.
- Do not send messages to the customer.
Output
Create a CRM note containing the proposed customer response. Include a separate note for the representative if additional investigation is required.
Step 6. Configure Actions, Knowledge, and Inputs
Your Custom Agent has instructions. Now you need to give it the tools and information to follow them.
In HubSpot Agent Builder, you'll configure what the agent can do, what knowledge it can reference, and what information it receives each time it runs.
Configure Agent Actions
Actions determine what your agent can do inside HubSpot and connected applications.
To configure them:
- In Agent Builder, click Add action in the left panel.
- Choose HubSpot, Default, or MCP in the right panel.
- Select the actions your agent needs.
Under HubSpot, use the Types dropdown to filter actions by Generate, Get data, or Take action.
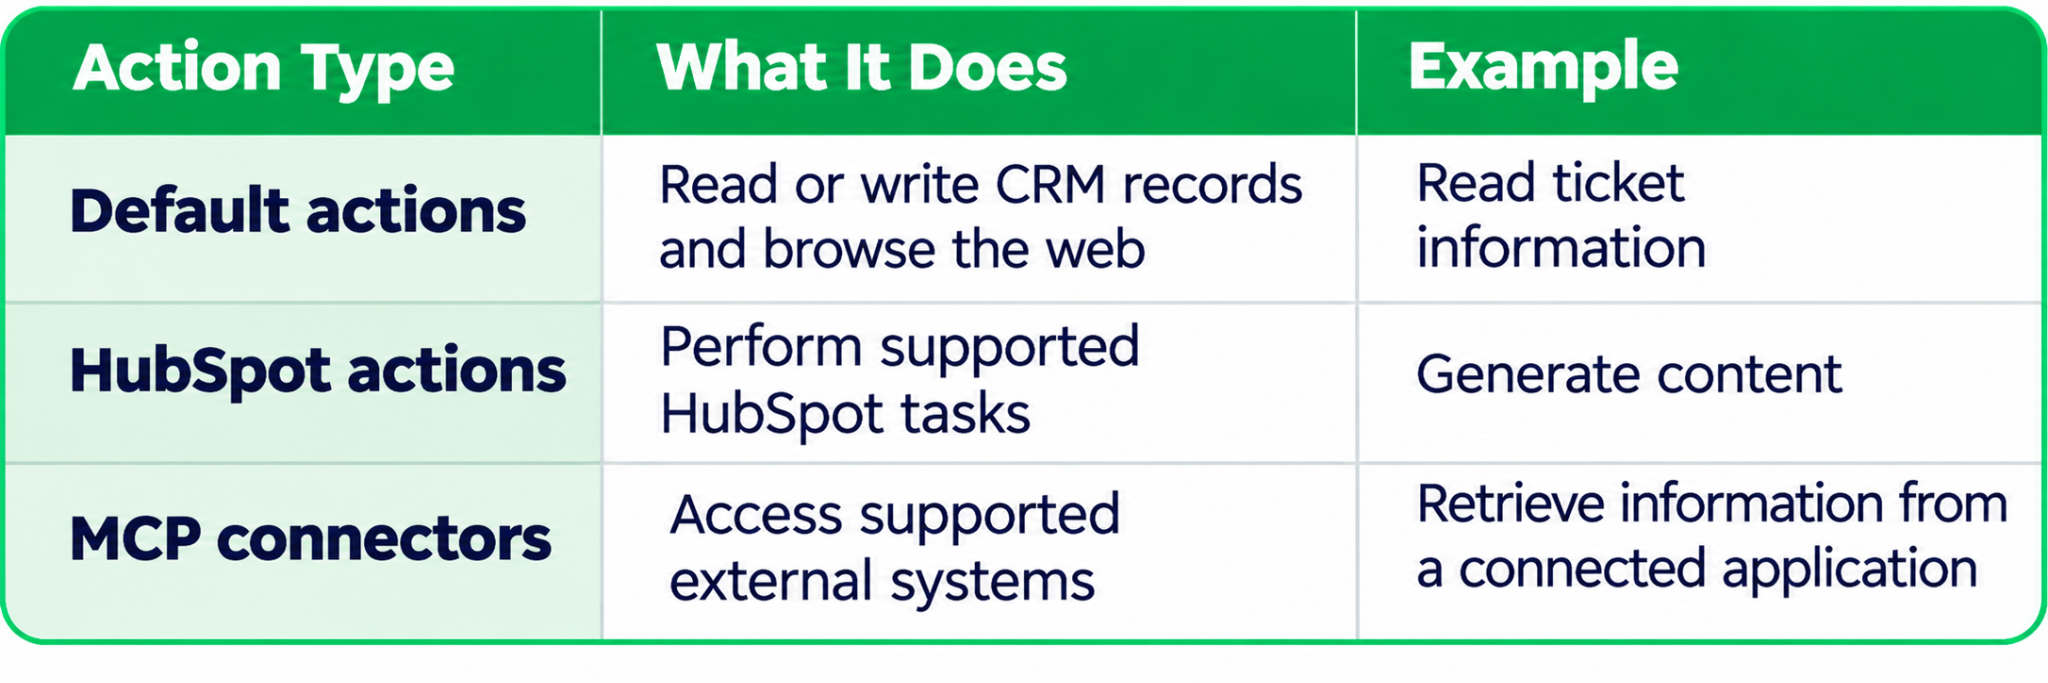
The available capabilities include:
- Read your HubSpot CRM records: Access tickets and associated CRM information.
- Write to your HubSpot CRM records: Create or update CRM information, subject to applicable permissions and approvals.
- Browse the web: Retrieve information from websites.
- HubSpot actions: Perform supported tasks involving content, sales activities, forms, or files.
- MCP connectors: Connect external systems through supported MCP servers. Authorization and available actions depend on the integration.
For our Ticket First Responder, add the CRM read and write actions.
The read action lets the agent review ticket information. The write action provides CRM writing capabilities, but you'll also need to confirm that the configured actions support creating the CRM note required by your instructions.
Add Knowledge Sources and Knowledge Vaults
Knowledge gives your agent reference material it can use across multiple runs.
To add knowledge:
- Find Knowledge in Agent Builder.
- Click Add knowledge.
- Choose the appropriate tab:
- Custom: Select an existing Knowledge Vault.
- Default: Select available account context, such as your brand kit or ICP.
- Integrations: Configure a supported external knowledge source.
- Select the information your agent should reference.
How to Create a Knowledge Vault
If Knowledge Vaults are available in your account:
- Navigate to Agents → Agent Hub → Context → Knowledge vaults.
- Click Create vault.
- Enter a name and description.
- Add relevant files, supported HubSpot content, or CRM segments.
- Create the vault, then return to Agent Builder.
- Select Add knowledge → Custom and choose your vault.
For Ticket First Responder, include documentation explaining how your company resolves common support issues.
Keep that documentation accurate and current. If the source material doesn't contain the answer, the agent may not have enough information to prepare a useful response.
Configure Agent Inputs
Inputs specify what information your agent receives for an individual run.
Unlike reusable knowledge, inputs can change every time the agent runs.
To configure them:
- In Agent Builder, find Inputs and click Add input.
- Open the Input type dropdown.
- Select an input type, such as CRM Object.
- Enter a descriptive name in the Label field.
- Add any additional inputs required for the task.
Step 7. Configure Agent Settings and Permissions
Before publishing your Custom Agent, configure who can use it, how often it can run, and where users can access it.
Review Your Agent Settings
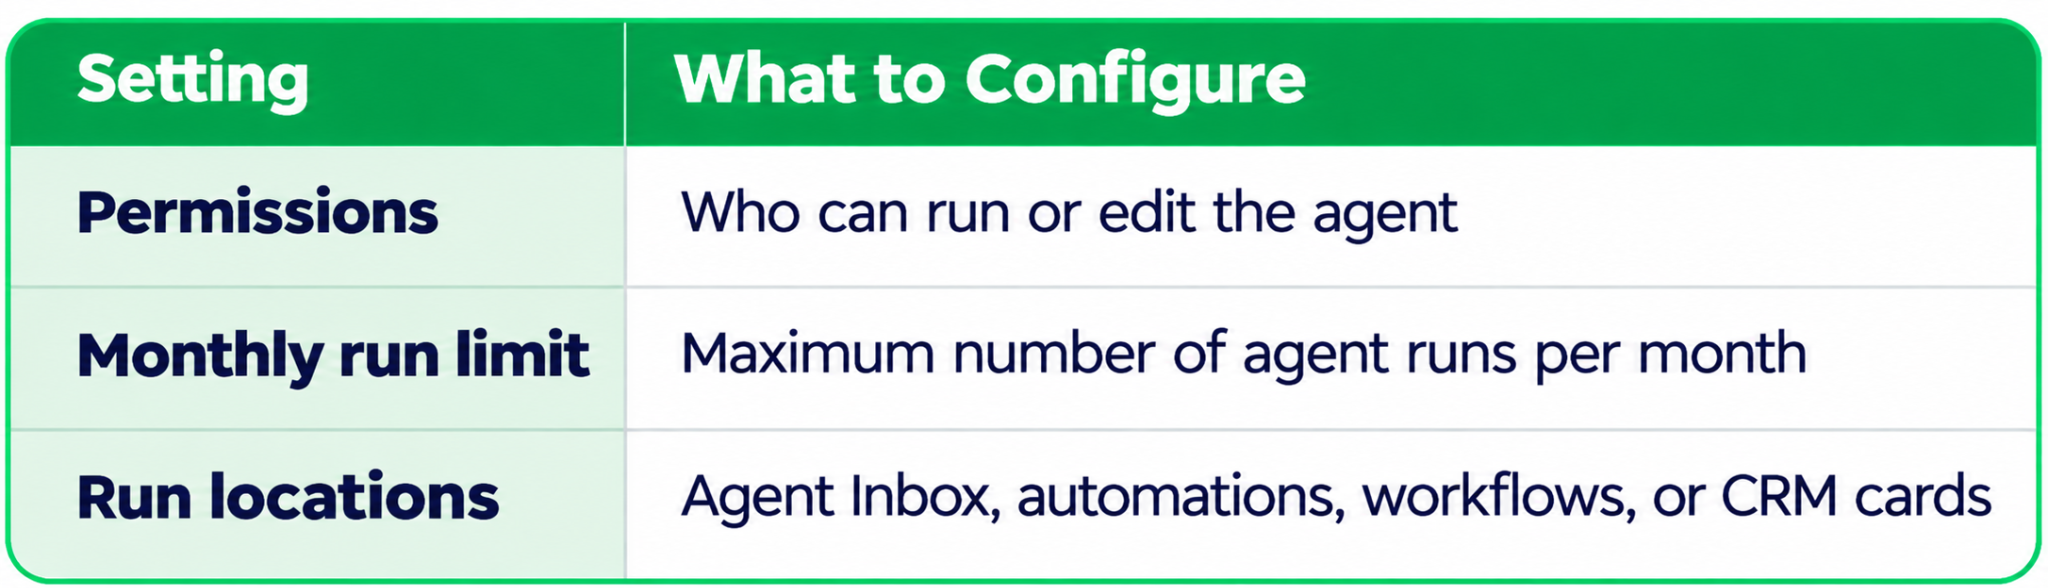
Configure Access and Usage
- Assign permissions. In Agent Builder, click the three-dot menu and select Assign access. Choose who can run or edit the agent, then click Update. By default, all users can run agents, while Super Admins can edit them.
- Set a monthly run limit. From the same menu, select Edit run limit. Turn on Monthly agent run limit, enter the maximum number of runs, and click Update. The agent stops running when it reaches this limit.
- Review estimated credits. HubSpot displays an estimated monthly credit range based on the run limit. Actual consumption may vary.
Choose Where Your Agent Runs
- Agent Inbox: Run agents manually.
- Automations and workflows: Run agents automatically. Available options depend on your subscription.
- CRM cards: In Run from, select CRM cards → Add to a CRM card, then choose the CRM object type.
For Ticket First Responder, grant the support team run access and make the agent available from ticket records. Remember that agent access doesn't override existing HubSpot permissions.
Step 8. Connect Your Agent to a Workflow
HubSpot Agent Hub workflows let you automate Custom Agents alongside CRM updates, conditional branches, and other workflow actions.
You can also connect multiple agents by passing information between workflow steps. This lets one agent complete a task before another uses its results.
How to Create an Agent Hub Workflow
Follow these steps to connect an existing Custom Agent:
- Navigate to Agents → Agent Hub.
- Click Create → Workflow.
- Select Add trigger and choose when the workflow should run, such as when a ticket meets specific criteria.
- Click the + Add icon to insert an action.
- Open the AI tab and select Run custom agent.
- Choose your existing Custom Agent and configure its required inputs.
- Add any additional workflow actions, including CRM property updates.
- Use branches or delays if your process requires them.
- Review the workflow before turning it on.
Agent Hub workflows support record-based, scheduled, and manual triggers. Each workflow can have one trigger, which you can change while editing.
How to Connect Multiple Agents in HubSpot
Here's how Ticket First Responder could work alongside Data Agent:
- A ticket enters the workflow after meeting the enrollment criteria.
- Data Agent analyzes the ticket to identify the issue category and priority.
- The workflow saves the findings to a custom ticket property called Ticket Triage Summary.
- Ticket First Responder runs using the summary and relevant CRM information.
- The workflow creates a CRM note containing the proposed response.
- A support representative reviews the draft before sending a reply.

Step 9. Test and Publish Your Custom Agent
Before publishing your HubSpot Custom Agent, test it on a few CRM records to make sure it works the way you intended.
How to Test a Custom Agent in HubSpot
- Navigate to Agents → Agent Hub → Agents and click Edit on the agent you want to test.
- In Agent Builder, click Test in the upper-right corner.
- Enter the required test inputs. For Ticket First Responder, select a representative support ticket.
- Click Test agent to run the simulation.
- Review the output. Check that the response follows your instructions and uses the correct ticket information.
- Check for errors. Look for missing details, incorrect recommendations, or information that doesn't match your support documentation.
- Refine and retest. Update the instructions or knowledge sources as needed, then test the agent with different tickets.
To review previous simulations, click Test → View history.
Testing in Agent Builder doesn't consume HubSpot Credits or make changes to CRM records, even if your agent has write actions enabled.
How to Publish Your Agent and Workflow
Once the agent consistently produces the expected output:
- In Agent Builder, click Save and publish changes to publish your agent.
- Resolve any configuration issues that prevent publishing.
- Navigate to Agent Hub → Workflows and open the associated workflow.
- Confirm that the workflow actions are connected and configured correctly.
- Click Save, then Turn on to activate the workflow. For changes to an existing workflow, select Save and publish changes.
Step 10. Monitor and Improve Agent Performance
Once your HubSpot Custom Agent is live, make sure it's doing the job you built it for.
Review its activity regularly and ask employees where they're still making corrections. Those findings will tell you what needs to change.
How to Review Agent Runs in Agent Inbox
- Navigate to More → Agents → Agent Inbox, or Agents → Agent Inbox if More isn't displayed.
- Click Filters to narrow results by agent, status, source, or owner. Click Apply.
- Select a run from the left panel.
- Check its status and estimated credit usage.
- Expand thinking steps to inspect how the agent approached the task.
- Expand sources to see which information it referenced.
- Review the output and any actions awaiting approval.
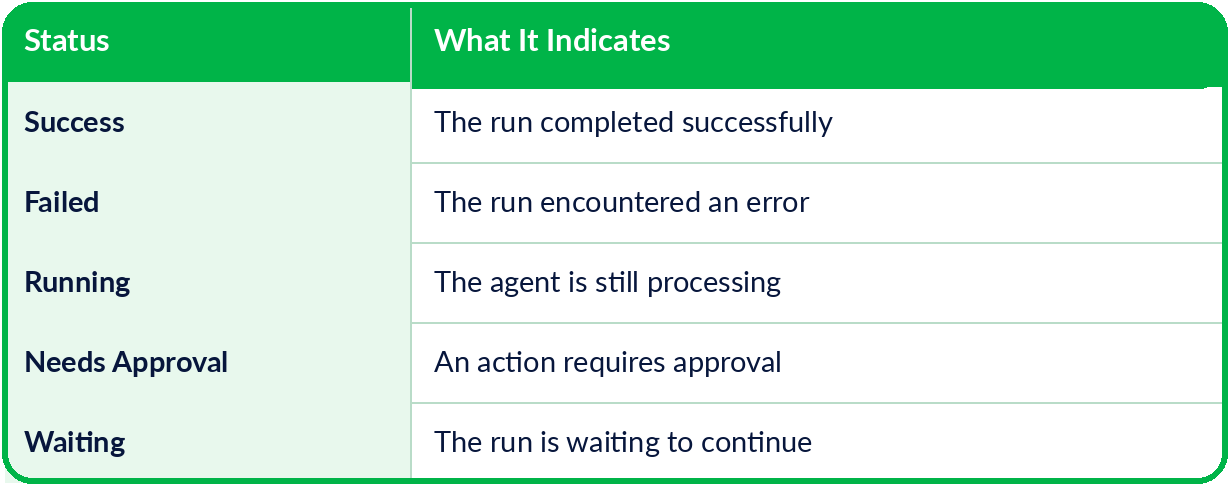
You can also refine results through chat, export output, or share runs with colleagues who have the appropriate access.
How to Troubleshoot Common Agent Problems
When something goes wrong, open the affected run and investigate what happened.
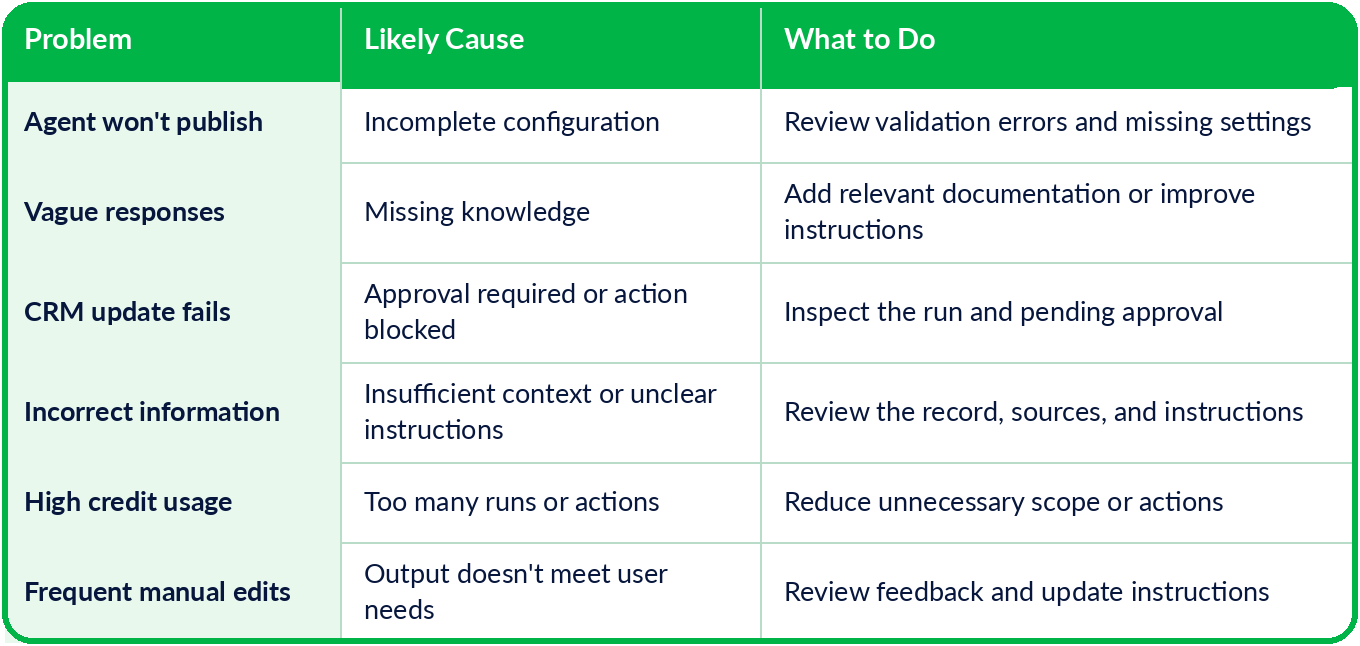
If the agent runs through a workflow, open Agent Hub → Workflows, select the workflow, and click Run history. Use this to investigate enrollment or workflow execution errors.
Review Output Quality and Credit Consumption
During the first three to four weeks, review a sample of completed runs each week.
For Ticket First Responder, compare the drafted responses with what support representatives actually send.
Look for repeated corrections. If employees keep rewriting the same part of a response, investigate why before changing the agent.
Track total runs, failures, and credit consumption alongside output quality. Agent Inbox shows estimated credits; use HubSpot's credit usage reporting to review actual consumption.
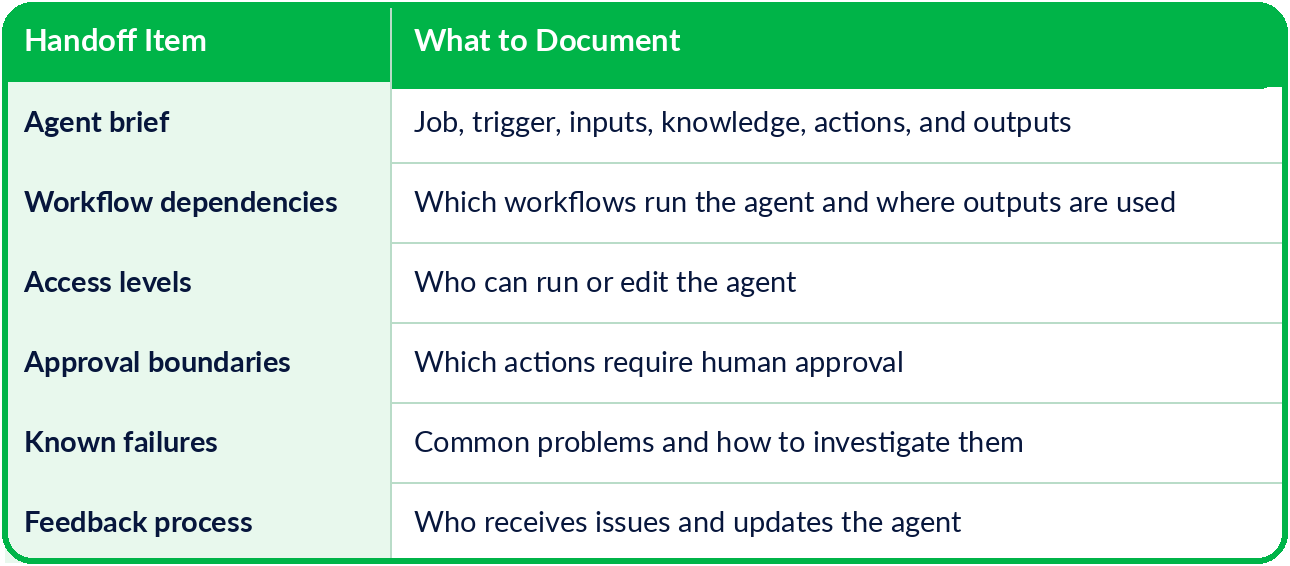
Assign an Agent Owner and Document the Handoff
Every deployed agent should have someone responsible for reviewing feedback and maintaining its configuration.
Train the People Using the Agent
Show employees a live example of the agent doing its job.
Explain how to review its output, handle approval requests, and correct an inaccurate response. Make sure everyone knows who to contact when something goes wrong.
Don't let employees quietly work around bad results. If they keep fixing the same problems without reporting them, the agent's owner won't know what needs improving.
Frequently Asked Questions About HubSpot Agent Hub
Is HubSpot Agent Hub free?
Agent Hub availability depends on your HubSpot subscription. Some Agent Builder features are available on eligible Starter plans, while more advanced automation capabilities require Professional or Enterprise subscriptions. Running Custom Agents can also consume HubSpot Credits.
What is the difference between Agent Hub and Breeze Studio?
Agent Hub is HubSpot's workspace for building, managing, and monitoring agents. Breeze Studio is an earlier name associated with HubSpot's AI customization tools. When following tutorials, check that the instructions match the current Agent Hub interface.
Can HubSpot Custom Agents update CRM records?
Yes. Custom Agents can read and write supported CRM information when the appropriate actions and permissions are configured. Some changes may require approval. The specific updates an agent can make depend on its available actions.
How many HubSpot Credits does a Custom Agent use?
Credit consumption varies based on the agent's configuration and the work it performs. Agent Builder provides estimates during testing, while HubSpot's credit usage reporting helps you monitor consumption after deployment.
Can multiple agents work together in HubSpot?
Yes. Agent Hub workflows can coordinate multiple agents by running them in sequence and passing information through CRM properties or supported workflow actions. For example, one agent can classify a support ticket before another prepares a response.